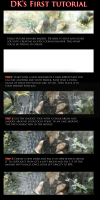
This is a pretty simple tutorial I'm going to show you guys, Item used: Photoshop cs3
1: Start a new project, I used 350 x115 but any size will do. Make sure your bg is black before you do anything.
2. Go to filter - Render- Lens Flare use a 105mm Prime at 125% Brightness. Then take a 35 px soft brush and smudge it till you feel you have done enough.
3. Get a render, any render will do really and center it. You must then duplicate the render once.
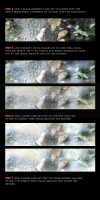
4. Go to Filter - Blur - Motion Blur and use angle use 30px at 45 degrees, and duplicate your blurred render about 4 or 5 times. but make sure the other layers are invisible. then move the duplicates around till your checker board is completely missing.
5. Go Merge the Blurred Layers and duplicate it twice, make one invisible and set one to Luminosity at 100 % Opacity and the otherone to Overlay at 71% Opacity. Merge them two layers together and set it to Overlay
6. Move your render above the others and duplicate it again. this time go to Blur Motion Blur and leave the pixels alone but change the angle to 0. Duplicate that one three times and move one under the original. Take the first one above the render and set it at 50% overlay and then set the one above it at 50% soft light.
7. Remember that last merged image I told you to hide? well make it visible and go to Pixelate - Mosaic and make it 20px blocks. Then make it 40% Opacity at normal. And move it under your last blurred render that is at an angle of 0 and 30px.
8. Just over that make a new layer and do a Scan Line Paint dump and set it to Softlight.
9. Above your top duplicate the one that is set at soft light create another new layer and use a 200px soft brush tip and make some lighting.
Here is an exaple of how mine came out: